build-a-wheel
Build a Tabletop Game Wheel
Welcome! If you’re here, you probably want to build a tabletop game wheel that sits on a card table. That’s awesome, and I’m glad to help by providing these instructions and files.
Basic Features and Design
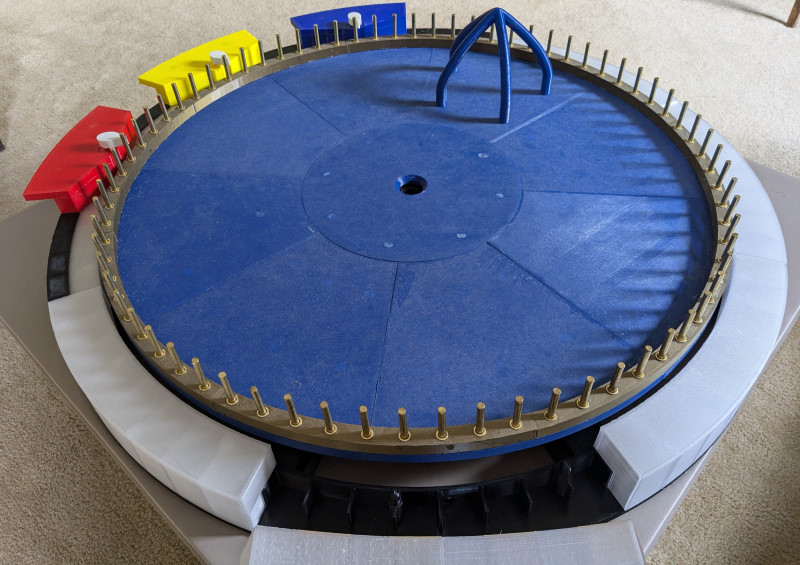 (Note: Gold vinyl trim package not included in instructions)
The finished wheel, including trim around the outside but not including pointer stations, is just a little under 34 inches in diameter and is made to fit a standard size card table.
Most of the wheel is designed to be 3D printed using PETG filament.
The wheel, as designed, has 72 spoke-based stops, but a modification to a single part design would theoretically allow it to support any number of stops, with stop counts divisible by 8 being easiest to implement.
The wheel is mostly held together using a peg-based system that allows easy assembly and fairly easy disassembly. Epoxies and glues are only used in limited circumstances.
The pointer design uses inexpensive tactical rubber bands to provide pointer motion.
The attractive gussetted spoke design utilizes common shelf pins and shelf pin sleeves.
Spaces on the wheel are designed for magnetic attachment, with magnets embedded into the 3D prints.
There is nothing about this design that limits it to one particular game. Get creative! For example, build a wheel layout that simulates rolling two six sided dice, and add more excitement to a whole host of games.
Important Things To Read and Consider Before Jumping In
A few notes before we get into the thick of it:
This build is not cheap or fast or small. It requires a lot of PETG filament and will literally take hundreds of hours of 3D print time. All of the other little parts are not too expensive individually, but they add up. Of course, you also need a full-sized 3D printer and possibly a vinyl cutting machine (see notes), both of which have upfront costs. The Master Bill of Materials tries to give a rough estimate of what this all will cost to make, but of course cannot be kept up to date with fluctuating prices. This thing is practically furniture. Again, it is 34 inches wide not accounting for how far the pointer stations stick out. Be sure to plan for space to build, use, and store it accordingly.
One thing that you will not find here is artwork to put on your wheel. These instructions produce a bare, unadorned wheel, without trademarked or copyrighted artwork. You will need to find artwork elsewhere.
While I have made efforts to make these processes accessible, they do require some crafting skill, particularly in but not limited to the 3D printing arena. It is not the intent of these instructions to provide detailed tutorials on common crafting techniques. Some level of proficiency with these will be assumed. Before starting this build, take time to review instructions regarding use of materials or tools you are unfamiliar with, and account for your individual need to practice with those novel tools and materials in order to produce a satisfactory result (i.e. maybe order extra because you might ruin the first couple attempts).
So far, these model files have been used exactly once, to produce my gaming wheel. These instructions were derived from my experience creating and using these files. It is possible that some modification may be necessary to achieve success, particularly with piece fit, with other 3D printers. This is by no means the final version of these instructions or the files. More people testing and using this design is key to improving it further.
These instructions and files are provided for free on an as-is basis, with no warranty of any kind. This material should be considered as “beta release” level at current. While I have done my best to try to ensure these instructions are error free, I do not guarantee that. I will try my best to fix any errors that are identified, but I am not obligated to do so. If I am available, I will try my best to help clarify instructions, provide additional tips, or submit corrections. I will not be responsible for ruined or unusable materials, or any inability to complete this project or any failure to achieve a particular level of quality with it.
Make sure to use proper workshop safety when building your wheel! Just the past weekend before writing this, I avoided an emergency room visit while working on the table to hold the finished wheel, by being mindful to tape a sharp end on a work piece before applying force near it. I am not liable for any accidents or mishaps that occur during the construction of your wheel. By using these instructions and files, you assume all risk of injury or damage resulting from their use.
Many hours of hard work and thoughtful design went into these models and instructions. Since I can’t feasibly build a wheel for everyone who wants one, I am releasing my model files and build instructions. I don’t expect to make money off of this project, but receiving credit for my work is nice. Therefore, if you share, modify and re-release, or feature a wheel built from this kit, please give credit.
Officially, all files are released under the Creative Commons 4.0 Attribution-NonCommercial-ShareAlike license. So no commercial ventures based around my design, please.
Main Documents
- Core Wheel - Master Bill of Materials
- Core Wheel - Master Build Instructions
- Core Wheel - Print Times
- Download All Files
What You Will Find Here
- 3D Model files (.stl) for the various parts of the wheel.
- 3D Model files (.stl) for jigs needed for assembly.
- Printing instructions for each 3D printed part.
- Sample 3D print Cura project file (.3mf) for reference, tuned for Creality CR-10S.
- Vector files (.svg) for parts to be cut on a vinyl cutting machine.
- Assembly instructions for each subassembly, including part manifest.
- General instructions including tips for successful printint and cutting.
- Master part, supply, and tool manifest for build.
Reporting Errors or Asking Questions
Both errors and questions can be submitted through the Github Repository Issue Page.
Please try to the best of your ability to check for an existing question or error report that matches yours so as to not create duplicates.
I do not promise any sort of turnaround time to provide answers or corrections.
General Build Notes and Tips
Apologies for Lack of Photos
Ideally I would have photos for the assembly processes, but currently I do not have those, since while designing and building I was in my engineering mind rather than my archivist mind. Over time I will work on making photos for some of the assembly processes, but there are some things like the plaster pours or epoxy work that I do not plan to do again unless breakage occurs.
Colors
Colors provided are merely a suggestion. You may use the exact colors provided, switch out a couple, or go completely off-script.
There are three main types of material that specify color. 3D Print Filament, Vinyl, and Cardstock. Each material has its own color gamut that also varies by brand. For example, Hatchbox Blue PETG definitely is not the same color as Inland Blue PETG.
3D Printing
3D Printer Size
This build was designed specifically to be printed using a 300mm (12 inch) or larger print bed. 300mm print beds were much more common when I bought my 3D printer. I understand that this no longer seems to be a common size, and that smaller print beds of 220mm or 256mm are more prevalent. This is a shame. It does look like there are some printers with 350mm print beds, and that would be more than adequate, but would require more 12 inch painter’s tape. The 300mm size is key to making a 28 inch wheel deck using only 14 pieces, and there are several pieces designed to take up a full 300mm print bed. Anyone is free to try to redesign this or make a smaller version that can be made on a smaller print bed.
Filament Type
The majority of this project is specified to use PETG filament, both because of its strength, and because of its tendancy to resist shrinking. Dimensional accuracy over a distance of one meter is very important for this project, and PETG can deliver on dimensional accuracy in a way that filaments like PLA cannot.
TPU is used for the pointers where flexibility and softness is desired.
It may be possible to use other materials besides PETG and TPU, however it may be necessary to adjust the models slightly to account for different shrinkage amounts.
PETG Filament Brand Quality
There can be substantial difference in quality between PETG filament brands. For my build, I used both Hatchbox and Inland (Inland is MicroCenter’s house brand). Hatchbox is definitely the better of the two, but Inland is also very usable.
I also used Duramic, but only for two thin add-on wedges of a special color (Magenta), which I don’t consider enough of a test of the brand to have an opinion either way on it. I’d need to do a thicker print with it to prove it.
I had horrible warping problems with Overture brand specifically (Gold color) and cannot recommend it.
Print Settings
I included the print settings that worked for me. Some are critical for success, such as nozzle diameter and layer heights, and pauses to insert magnets. Others can be tweaked for your specific circumstances. In general:
- Wide brims should be used on large parts, to combat warping.
- PETG likes to be nice and hot. I found that a 250C print temperature works best for most brands.
- The 85% initial layer flow helps with the stringing and boogering that can be an issue with PETG.
- If your setup can handle it, speed can be tweaked.
- The Z-Seam Position setting of “Front Right” goes hand-in-hand with proper build plate orientation
If you are experiencing underextrusion after a travel, try adjusting “Extra Prime After Retraction” in increments of 0.216 for prints using 0.6mm nozzle diameter, and in increments of 0.064 for prints using 0.4mm nozzle diameter. but be aware I noticed that this setting can affect fit.
Cura Project Files
The Cura project files (.3mf) that I provide are for reference. If you do not have the same 3D printer as me (Creality CR-10S), these project files probably will not work as-is with your printer, but you can use them as a guide to see how to set up your project file (for example, to see how a part should be placed on the print bed or how a particular setting is applied).
Preparing the Print Bed
Printing PETG directly onto glass is generally not a good idea. The PETG can adhere to the glass better than the glass adheres to itself, resulting in pulling up chips and chunks of glass out of your print bed. Let’s avoid that.
The idea is to provide a seamless surface to print on. so stripes of thinner painter’s tape are out; no matter how good you are at lining them up, there will always be a tiny, noticeable seam on the bottom of the print.
I used 12” painter’s tape, but at this point, I’m unable to order the good kind of 12” painter’s tape. The first brand I used was awesome, filament adhered well to it, and once I learned its quirks I really loved it. However, this brand now seems to be unavailable, and every brand I’ve tried since is absolutely horrible at bed adhesion.
There are other options, such as Build-Tac, but I have not tried any of those, so I have no idea as to functional or cost effectiveness. You are free to use any of these other means instead, though you will have to revise the affected build steps.
The 12” tape that I liked seems to have been manufactured by MercoTape, however, they do not seem to do direct sales. I contacted them, but as soon as they found out I wasn’t a bulk customer they ghosted me.
Before preparing your print bed, be sure to wash your hands or use clean gloves to prevent oils/contaminants from getting on surfaces that will need filament adhesion.
The easiest way I found to apply the 12” painter’s tape to print bed glass:
- Unroll the tape sticky side up onto a clean work surface without cutting it off of the roll, enough to cover plus wrap about a half inch to an inch around the side of the print bed.
- Take the print bed glass, and line it up upside side down parallel with the tape. Lower the end closest to the end of the tape onto the tape (leaving a half inch to an inch from the end), creating a hinge.
- Still holding the glass with one hand, pull the roll of tape taut.
- Lower the glass the rest of the way onto the tape with one swift motion.
- Cut the tape off of the roll, being sure to leave a half inch to an inch past the glass.
- Turn the glass over. The tape will probably be wavy, but should not have any creases.
- Place the glass on the printer. Do not wrap tape underneath yet.
- Starting from any corner, pull the tape up from the corner to about the center of the print bed.
- Working from the center outward to the edges and corner, smooth the tape into place on the print bed, taking care to not create creases.
- Repeat prior two steps for each corner, and repeat each corner again until tape is smooth on the print bed.
- Wrap edges around the bottom of the print bed.
- Secure the print bed into place.
Even with the tape layer, removing prints can be a challenge. I recommend a good metal putty knife that can be used to get under the tape. Be careful when using it, though.
If the tape leaves residue on the glass print bed and you are just planning to put another layer of tape down, you can save yourself some hassle and not worry about cleaning the residue. The next application of tape should remove it.
When you do finally finish with the tape and are ready to clean the print bed, the gentlest cleaning method is to heat the bed to about 50C, and use a rag with white vinegar to wipe the residue off with a firm circular motion.
Print Bed Leveling Tips
Do not rely solely on the sheet of paper method to level your print bed.
Adjust bed corners finely and properly during brim or skirt printing.
There should be no gaps between filament lines on the first layer. If there are gaps the bed is too low in that area.
The layers should not look combed through by the nozzle. Nozzle combing means the bed is too high in that area.
Ideally, the parallel filament lines should look like rectangular bars that are welded smoothly together.
If the filament lines look more cylindrical than boxy, the bed is too low.
Filament smooshed down beyond a box shape means the bed is too high.
More than just a tiny bit of stringing means that the bed is too high.
Tips for Preventing Warping in Large Prints
Due to tight fit tolerances, it is critical that warping be controlled during printing of this project. These tips can help.
For larger prints especially, preheat the print bed and keep at temperature for several minutes before printing. This ensures that the heat is evenly distributed across the print bed as much as possible, as well as allowing the local ambient temperature to rise a bit.
Allow the bed to cool to below 60C before removing a print to ensure that the polymers are cooled and “set” to prevent warping/bending on removal.
An enclosure to ensure an evenly heated print environment would further protect against warping but was found to not be necessary for my setup. Your results may vary.
Even all of this will not prevent warping 100%, so don’t panic if your wheel deck pieces don’t sit perfectly flat. Mostly flat should be fine.
Model Files and Orientation on Build Plate
I have tried to orient all STL files so that when dropped into Cura, the correct side is oriented downward. However, STL files are not yet optimized to proper rotation around the Up axis. In general, if a large piece has a corner that points toward the center of the wheel, the piece should be rotated on the build plate so that corner is in the front-right quadrant of the build plate.
Cutting
Vinyl Cutting Machine
You may notice that in these instructions, even though I have a Cricut vinyl cutter, I generally don’t refer to it by brand name and instead just call it “vinyl cutter”. My Cricut machine has served me well when actually doing the job of cutting, and I can’t deny that. However, their subpar Designer software, closed eco-system, and requirement to log in to a service to use the machine really irk me. So I can’t really give the machine a ringing endorsement, just a lukewarm one with a strong caveat of, “beware, one day the service may disappear and the machine then likely turns into a brick unless haxxd.” Probably a Silhouette can do just as good of a job with this stuff, but I’m not familiar with those.
Do I Really Need a Cutting Machine?
You do not need a cutting machine to build the core wheel if you have some other means of satisfactorily cutting the felt to dampen the strut rollers.
A cutting machine may still come in very handy for making artwork to go on the wheel, though.
General Assembly
Peg Holes
This wheel is largely built from parts that interlock using pegs and holes, similar to Lego. The pegs should be a bit tighter than your typical Lego fit, though.
All pegs are beveled to assist lining up with holes.
A rubber mallet may be gently used to help drive pegs in. Take care not to use too much force.
It should not be necessary to use glue or other adhesives to join pieces except where specifically noted. Permanently gluing pieces together increases the risk of having to replace multiple pieces if one piece breaks.
Separating Peg-joined Pieces
If two assembled pieces need to be separated, a flat-blade screwdriver can be used:
- Carefully insert the blade between the two pieces, taking care not to marr the pieces.
- Take care not to introduce too much force between the pieces.
- Slowly rotate the screwdriver up to 90 degrees.
- Remove the screwdriver and repeat in a different location along the joint.
- Repeat until the two pieces can be separated by hand.
Use and Care
Spinning the wheel should be performed by grabbing one of the spokes, and using it to induce rotation in the wheel in one fluid motion.
It is recommended that the wheel not be spun with more strength than is needed to make the wheel go one and a half revolutions. This is a house rule for us.
It is recommended to not allow food or drink near the wheel. This is another house rule for us.
To clean, wipe with a slightly damp cloth.
Felt may need to be replaced periodically. I’ll update when mine wears out.
Bearings should not need attention or replacement for a long, long, long time.
Every few games, take off all wedges and some OUTER pieces and inspect under the wheel. Check for loose joints in the wheel deck and re-tighten them. Check felt, and check that all rollers are still in place.
I’ve yet to have a piece break from use, however, if a piece does break, just print a new one to replace it.
To use the Demispider to remove a tile, place the Demispider so that the legs are over the magnets in the left and right segments of the tile, and lift the outer edge upward first.
The Demispider should be able to hold a stack of 4 tiles if handled carefully. Place a hand underneath if carrying a loaded Demispider.